色彩空間轉換
在 Opencv-Python 學習之旅 - 1 起步 - 照片(影像) 中
imread函數就有選擇讀取照片時你想要的色彩標誌參數 (BGR, HSV … 等)。
在 OpenCV 中還有其他的函數來作色彩空間轉換的處理。
import cv2
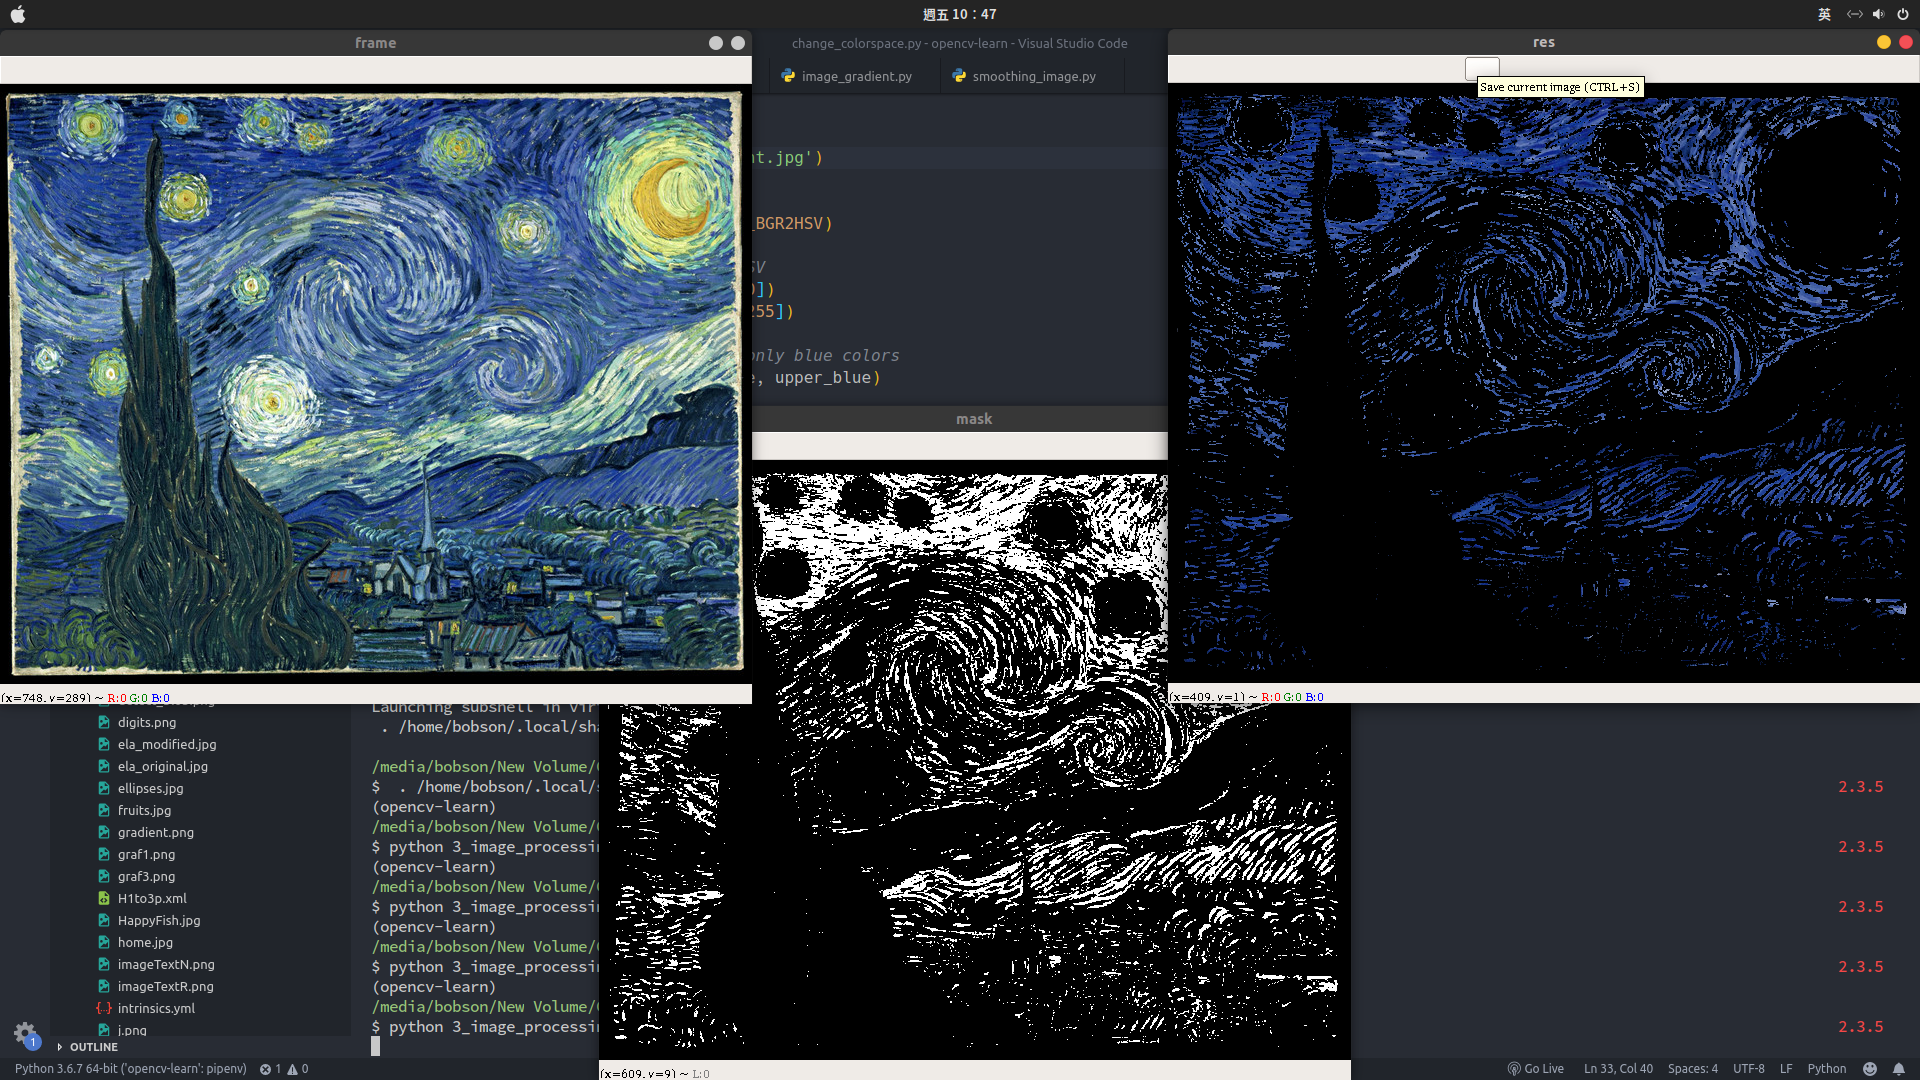
img = cv2.imread('data/starry_night.jpg')
# Convert BGR to HSV
hsv = cv2.cvtColor(img, cv2.COLOR_BGR2HSV)
# (600, 752, 3) 1353600 <class 'numpy.ndarray'>
print(hsv.shape, hsv.size, type(hsv))
# define range of blue color in HSV
lower_blue = np.array([110, 50, 50])
upper_blue = np.array([130, 255, 255])
# Threshold the HSV image to get only blue colors
mask = cv2.inRange(hsv, lower_blue, upper_blue)
# Bitwise-AND mask and original image
res = cv2.bitwise_and(img, img, mask=mask)
cv2.imshow('frame', img)
cv2.imshow('mask', mask)
cv2.imshow('res', res)
k = cv2.waitKey(0)
if k == 27: # wait for ESC key to exit
cv2.destroyAllWindows()cv2.cvtColor可以轉換色彩空間,用cv2.inRange來定義藍色上下限值製作遮罩圖。- 遮罩圖中白色為1;黑色為0,最後再例用
cv2.bitwise_and將圖片中藍色值過濾出來。 - 相關 API 文檔 Operations on Arrays、miscellaneous transformations
- 結果:
影像閾值(門檻值)
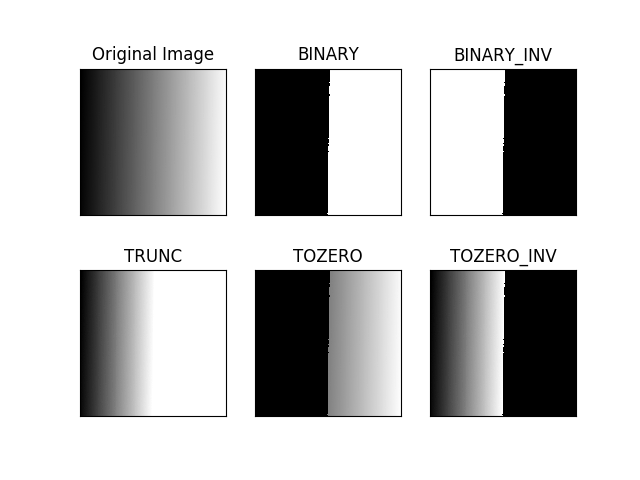
固定閾值(簡單閾值)
- cv2.THRESH_BINARY
- cv2.THRESH_BINARY_INV
- cv2.THRESH_TRUNC
- cv2.THRESH_TOZERO
- cv2.THRESH_TOZERO_INV
import cv2

from matplotlib import pyplot as plt

img = cv2.imread('data/gradient.png', 0)
ret, thresh1 = cv2.threshold(img, 127, 255, cv2.THRESH_BINARY)
ret, thresh2 = cv2.threshold(img, 127, 255, cv2.THRESH_BINARY_INV)
ret, thresh3 = cv2.threshold(img, 127, 255, cv2.THRESH_TRUNC)
ret, thresh4 = cv2.threshold(img, 127, 255, cv2.THRESH_TOZERO)
ret, thresh5 = cv2.threshold(img, 127, 255, cv2.THRESH_TOZERO_INV)

titles = ['Original Image', 'BINARY',
          'BINARY_INV', 'TRUNC', 'TOZERO', 'TOZERO_INV']
images = [img, thresh1, thresh2, thresh3, thresh4, thresh5]

for i in range(6):
    plt.subplot(2, 3, i+1), plt.imshow(images[i], 'gray')
    plt.title(titles[i])
    plt.xticks([]), plt.yticks([])

plt.show()- 以固定值去作二值化,藉以過濾影像。
- 相關 API 文檔 miscellaneous transformations - threshold
- 結果:
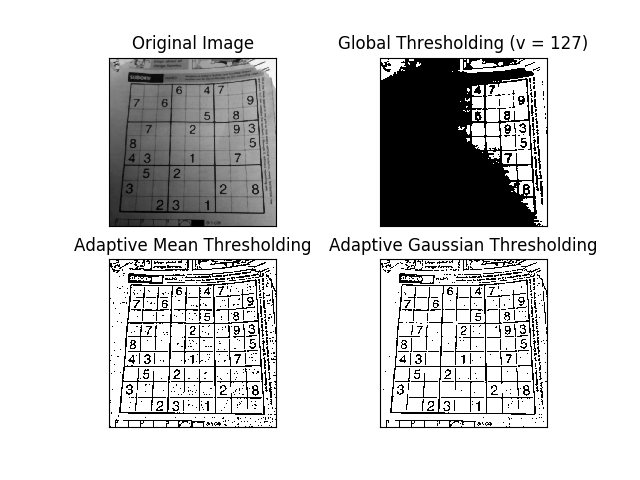
調整性閾值
有時候由於拍照時光線不均,所以影像每個區域的灰階值基準不同,這時很難找到一個閾值能適用整張影像,然後得到良好的二值化結果,這時我們可以將影像分成幾個區域,每個區域有各自的閾值,再分別將各個區域進行二值化,OpenCV用adaptiveThreshold()函式來進行此作法。
- cv2.ADAPTIVE_THRESH_MEAN_C : 以鄰近格的平均值減去 C 當作閾值。
- cv2.ADAPTIVE_THRESH_GAUSSIAN_C : 以鄰近格的高斯加權平均值減去 C 當作閾值。
import cv2

from matplotlib import pyplot as plt

img = cv2.imread('data/sudoku.png', 0)
img = cv2.medianBlur(img, 5)

ret, th1 = cv2.threshold(img, 127, 255, cv2.THRESH_BINARY)
th2 = cv2.adaptiveThreshold(img, 255, cv2.ADAPTIVE_THRESH_MEAN_C,
                            cv2.THRESH_BINARY, 11, 2)
th3 = cv2.adaptiveThreshold(img, 255, cv2.ADAPTIVE_THRESH_GAUSSIAN_C,
                            cv2.THRESH_BINARY, 11, 2)

titles = ['Original Image', 'Global Thresholding (v = 127)',
          'Adaptive Mean Thresholding', 'Adaptive Gaussian Thresholding']
images = [img, th1, th2, th3]

for i in range(4):
    plt.subplot(2, 2, i+1), plt.imshow(images[i], 'gray')
    plt.title(titles[i])
    plt.xticks([]), plt.yticks([])
plt.show()- 以
adaptiveMethod調整性函數去作二值化,藉以過濾影像。 - 相關 API 文檔 miscellaneous transformations - adaptiveThreshold
- 結果:
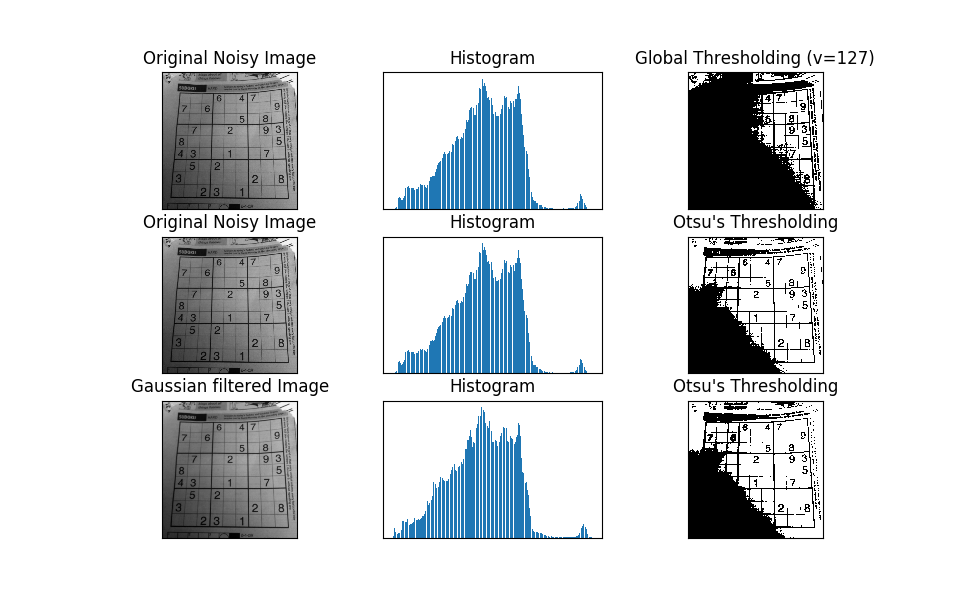
大津演算法二值化
Otsu流程:
* 先計算影像的直方圖
* 把直方圖強度大於閾值的像素分成一組,把小於閾值的像素分成另一組。
* 分別計算這兩組的組內變異數,並把兩個組內變異數相加。
* 將0~255依序當作閾值來計算組內變異數和,總和值最小的就是結果閾值。
import cv2

from matplotlib import pyplot as plt

img = cv2.imread('data/sudoku.png', 0)

# global thresholding
ret1, th1 = cv2.threshold(img, 127, 255, cv2.THRESH_BINARY)

# Otsu's thresholding
ret2, th2 = cv2.threshold(img, 0, 255, cv2.THRESH_BINARY+cv2.THRESH_OTSU)

# Otsu's thresholding after Gaussian filtering
blur = cv2.GaussianBlur(img, (5, 5), 0)
ret3, th3 = cv2.threshold(blur, 0, 255, cv2.THRESH_BINARY+cv2.THRESH_OTSU)

# plot all the images and their histograms
images = [img, 0, th1,
          img, 0, th2,
          blur, 0, th3]
titles = ['Original Noisy Image', 'Histogram', 'Global Thresholding (v=127)',
          'Original Noisy Image', 'Histogram', "Otsu's Thresholding",
          'Gaussian filtered Image', 'Histogram', "Otsu's Thresholding"]

for i in range(3):
    plt.subplot(3, 3, i*3+1), plt.imshow(images[i*3], 'gray')
    plt.title(titles[i*3]), plt.xticks([]), plt.yticks([])
    plt.subplot(3, 3, i*3+2), plt.hist(images[i*3].ravel(), 256)
    plt.title(titles[i*3+1]), plt.xticks([]), plt.yticks([])
    plt.subplot(3, 3, i*3+3), plt.imshow(images[i*3+2], 'gray')
    plt.title(titles[i*3+2]), plt.xticks([]), plt.yticks([])

plt.show()- 此方式較複雜,利用大津演算法算出閾值
- 結果:
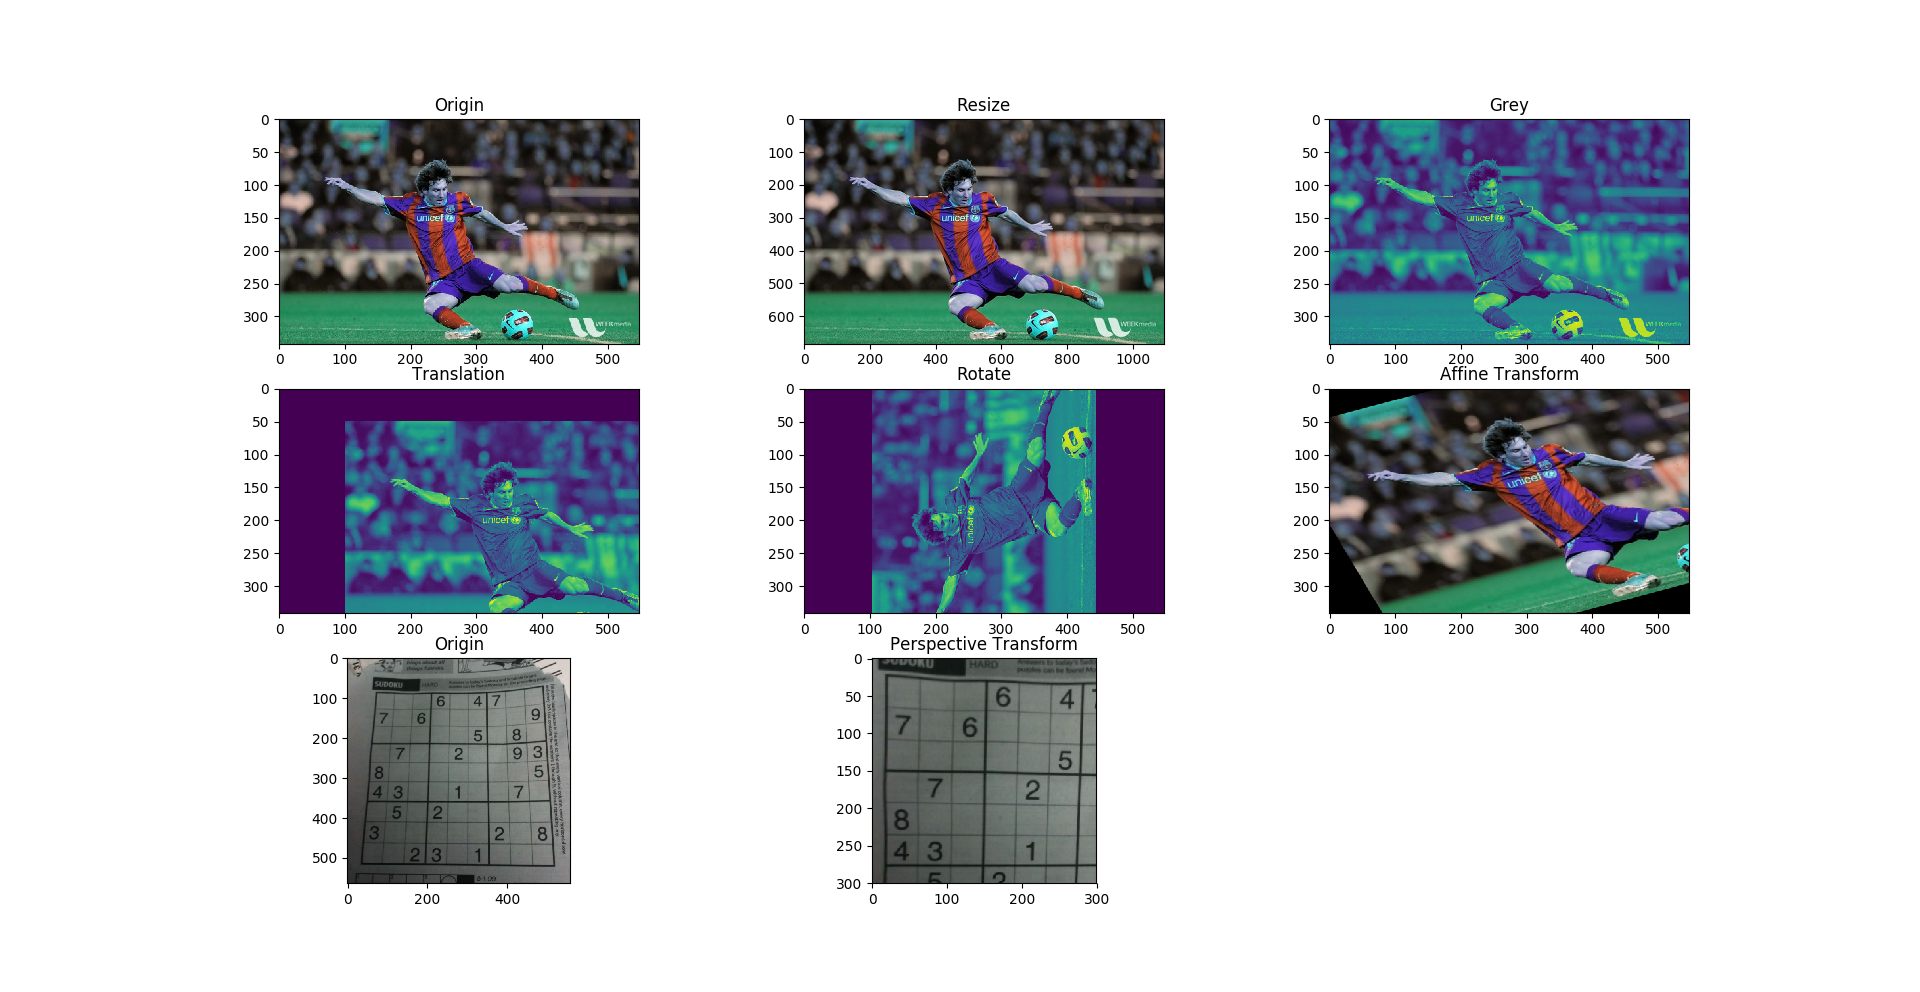
影像的幾何轉換
import cv2
import numpy as np

from matplotlib import pyplot as plt

ori_img = cv2.imread('data/messi5.jpg')

# Resize
resize = cv2.resize(ori_img, None, fx=2, fy=2, interpolation=cv2.INTER_CUBIC)
# OR
# height, width = img.shape[:2]
# res = cv2.resize(img, (2*width, 2*height), interpolation=cv2.INTER_CUBIC)

grey_img = cv2.imread('data/messi5.jpg', 0)
rows, cols = grey_img.shape

# Translation
M = np.float32([[1, 0, 100], [0, 1, 50]])
translation = cv2.warpAffine(grey_img, M, (cols, rows))

# Rotate
M = cv2.getRotationMatrix2D((cols/2, rows/2), 90, 1)
rotate = cv2.warpAffine(grey_img, M, (cols, rows))

plt.subplot(331), plt.imshow(ori_img), plt.title('Origin')
plt.subplot(332), plt.imshow(resize), plt.title('Resize')
plt.subplot(333), plt.imshow(grey_img), plt.title('Grey')
plt.subplot(334), plt.imshow(translation), plt.title('Translation')
plt.subplot(335), plt.imshow(rotate), plt.title('Rotate')

# Affine Transformation
rows, cols, ch = ori_img.shape

pts1 = np.float32([[50, 50], [200, 50], [50, 200]])
pts2 = np.float32([[10, 100], [200, 50], [100, 250]])

M = cv2.getAffineTransform(pts1, pts2)

dst = cv2.warpAffine(ori_img, M, (cols, rows))

plt.subplot(336), plt.imshow(dst), plt.title('Affine Transform')

# Perspective Transformation
img = cv2.imread('data/sudoku.png')
rows, cols, ch = img.shape

pts1 = np.float32([[56, 65], [368, 52], [28, 387], [389, 390]])
pts2 = np.float32([[0, 0], [300, 0], [0, 300], [300, 300]])

M = cv2.getPerspectiveTransform(pts1, pts2)

dst = cv2.warpPerspective(img, M, (300, 300))

plt.subplot(337), plt.imshow(img), plt.title('Origin')
plt.subplot(338), plt.imshow(dst), plt.title('Perspective Transform')

plt.show()- 將一幅影像的座標位置,映射到新座標,但不改變像素值。簡單說就是矩陣的幾何運算。
cv2.warpAffine為仿射轉換函數,利用 2 x 3 的仿射(轉置)矩陣,可以達成圖片的放大、縮小、旋轉、左右反轉、扭曲。- 仿射(轉置)矩陣可以用
cv2.getAffineTransform、cv2.getRotationMatrix2D… 等函數取得。 cv2.warpPerspective為透視轉換函數,與仿射轉換函數雷同,不過透視矩陣為 2 x 4 大小;此矩陣可用cv2.getPerspectiveTransform取得。- 相關 API 文檔 geometric transformations
- 結果:
你也可以瞧瞧…
參考
- 官方教學文檔 - Image Processing in OpenCV
- 阿洲的程式教學 | OpenCV教學 - 幾何變換 & 二值化
- Otsu thresholding | Image Processing #12 | HBY coding academic
系列文